Protegé5 Speaker Install
The illustrated story of my installation of aftermarket speakers into my Protegé5.
Set-Up | Rear Speakers | Front Speakers | The Verdict
Introduction
This is the illustrated story of how I installed new speakers into my 2002 Mazda Protegé5. I installed these:
- JBL 6.5" 3-way GTO635 in the rear doors
- JBL 6.5" component GTO605C in the front doors
These are very similar to Infinity speakers in many respects and I suspect have the same mounting constraints.
Disclaimer: I am a rank novice at this--I've never installed anything more complicated than an air filter in my car before. While I have done home theater installation and I'm OK with a solder iron, I've never mucked around with a car before. Thus, I made a lot of mistakes when doing this. The idea here is to help other novices avoid mistakes. If you already know what you're doing, this page is not for you.
Set-up
Since what I put in does not quite match the standard speakers in the Pro5, I bought a couple things to help make everything fit:
- Sosche SAF7 adapter brackets (for rear doors)
- Scosche SA68 adapter brackets (for front doors)
- A bunch of Dynamat
Tools you might find useful:
- Cordless screwdriver
- Needle-nose pliers
- Terminal ends
- Crimp tool
- Wire strippers
- Wire cutters
- Speaker wire
- Exacto knife and good cutting surface
- Some kind of roller for the Dynamat
- Bunch of screws
- Magic marker
You probably want a portable work light (more powerful than a standard flashlight) as sometimes you really need light in just a particular spot.
Installing Rear Door Speakers
1. Remove Door Panel
This is more involved than one might think from some of the other Web sites I've read, so I'm going to go into some detail. There are a lot of sub-steps:
1.1 Remove all fasteners
There are three fasteners that you need to remove. Two are pop-type fasteners that live on the edge of the door, perpendicular to the direction of the panel itself. You want to pop these first, then pull them out--I used needlenose pliers for this. You can see these in Picture #1.
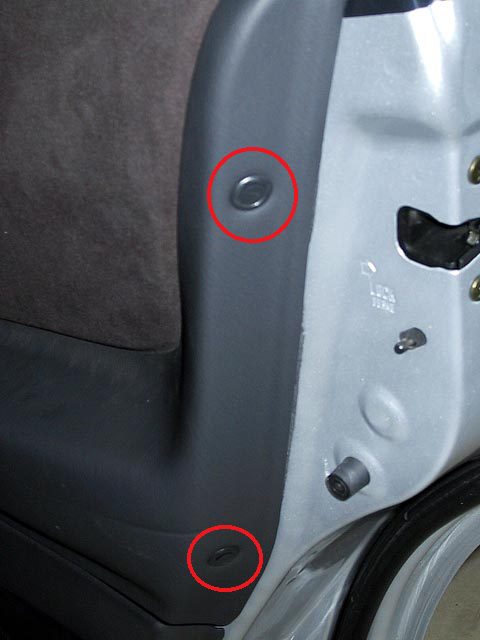 Picture #1
The third is near the inner (hinge) end of the panel, near the top. This screws out. Highlighted with a red circle in Picture #2.
1.2 Remove the door handle and screws
The door handle itself just pulls off, though you have to be careful how you grab it and have to pull pretty hard to get it to come off cleanly. That will reveal two screws, which you need to remove.
 Picture #2
There is a third screw you want to take out in the well for the pull handle (the thing you grab when you want to open the door). Pull the handle up and you'll see the screw in there.
1.3 Pull off the door panel
It does just pull off, but you probably want to do this in phases. First, pull the edges up so it pulls off all the fasteners. You have to pull pretty hard to do this. I'd start at the lower edge of the panel. Then, work the door pull housing through the hole in the panel.
Then, once you have all the fasteners out, you can take off the panel by lifing up so the lock runs through the hole. You won't get far, though, as the panel is attached to the door because of the power window lead. While holding the panel with one hand, reach in and press the little plastic bit of the plastic harness that serves as a latch. Then you can pull away the panel.
2. Remove Old Speaker
Fortunately, this is pretty easy. There are three screws that hold the speaker on, just unscrew them. The speaker is attached to the wires by a harness. Again, there's a bit of plastic on the harness you press so it'll release cleanly. Use it.
You'll want to maintain the integrity of that harness. Don't pull too hard or cut the wires or else you'll have to do some soldering. Also, note which of the leads is positive and which is negative. It isn't indicated on the harness, but it is on the speaker, so take note before you remove it.
3. Mount New Speaker
Why Mazda uses the three-point mount in the size they do I'll never understand. Anyway, the screw holes for the speaker, of course, don't even come close to matching this, nor do any of the adapter rings that come with the replacement speakers. However, one of the metal adapter rings that comes with the replacement lines up nicely with the SAF7 adapter. Place on the other and rotate the metal ring until the holes line up with holes in the SAF7 adapter ring. Mark those holes.
Now, what this would leave in the car is door panel to plastic ring to metal ring to speaker. Seems like a lot of possibility of vibration, so I used the SAF7 as a template and cut out bits of Dnyamat to match this. I then applied the Dynamat, cut small holes in it for the screws, and mounted the bracket to it. Picture #3 shows the door with this on.
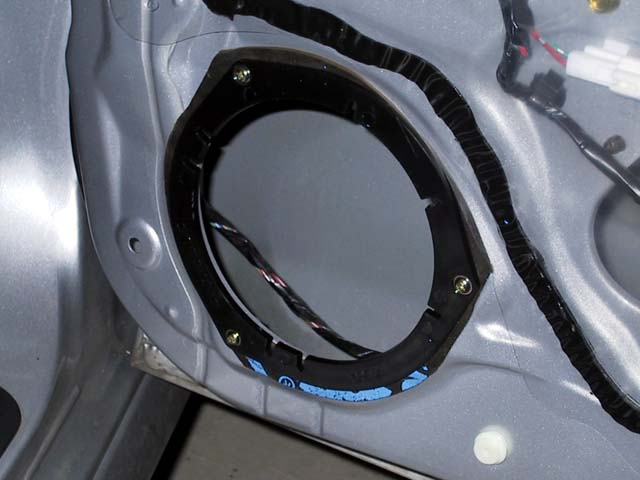 Picture #3
I then added another layer of Dynamat and screwed in the metal mounting bracket. This felt nice and solid and shouldn't rattle. See Picture #4.
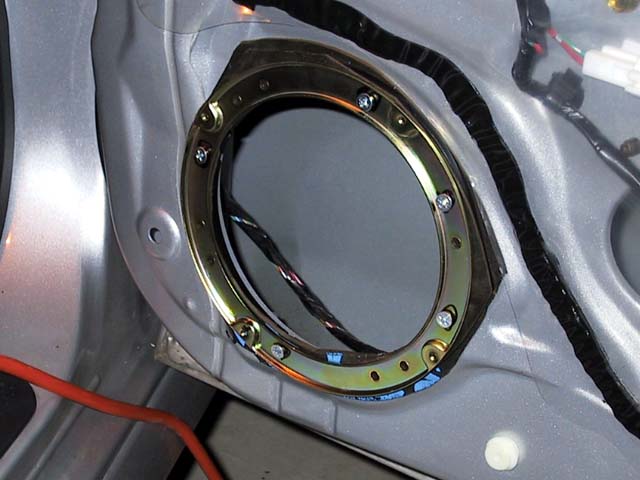 Picture #4
Now you need to wire the speaker. I didn't think the leads from my speaker would match with the harness and I bet they won't for you, either. I'd take some wire and mount terminal ends, then run that wire from the harness to your speaker leads. (Don't do what I did and have to solder this.)
Now, if your speakers have big tweeters that stick up like mine, you may not be able to get the panel back on without it pushing on the speakers (I couldn't, but I didn't think of that at the time.) If so, you'll want to include the ring for the speaker grille before you screw the speaker into the door.
Here's the speaker without the grille ring or grille:
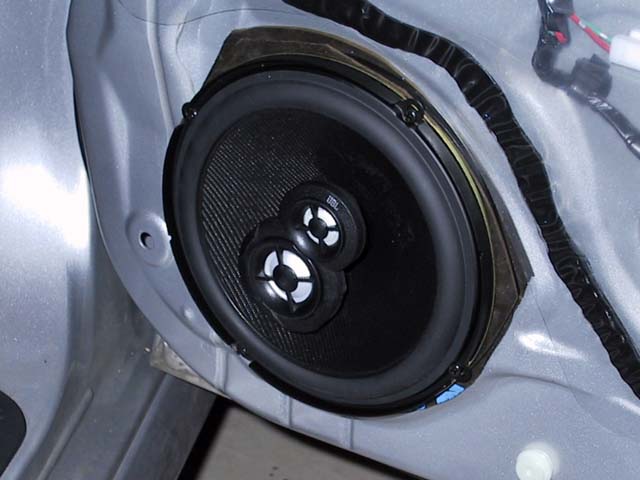 Picture #5
And here it is with the grille:
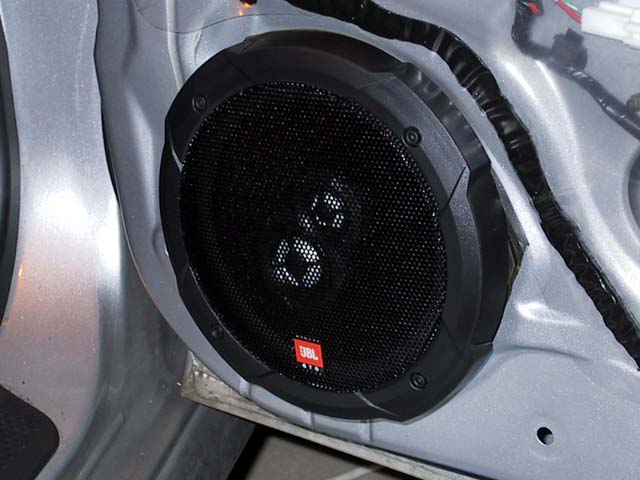 Picture #6
You probably want to make sure the speaker is working before you put the door panel back on, and if you use speakers with longer mounting depth, make sure you can roll the window all the way down.
4. Restore door panel
This could be really easy or really hard, depending. I royally screwed this up because I didn't initially realize how hard the speaker pressed against the panel until I had put it back on. I realized I'd have to cut a hole in the panel and put the grille on the speakers. I really don't know the best way to cut a hole in the panel that really matches up to the speaker--if anyone knows how the pros do this so that it matches up nice, I'd love to know. I ended up with some really, really nasty gaps around the speaker because I mis-cut it:
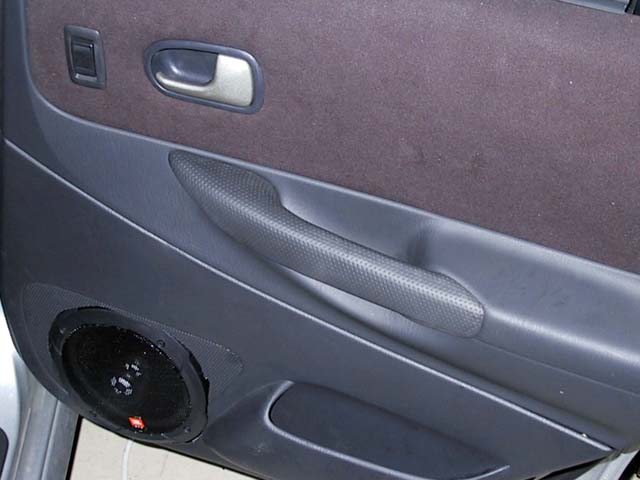 Picture #7
Yuck. Fortunately, everything is black so they don't stand out unless you're really looking at them. However, if anyone has any suggestions on how to make this mess look better, I'd love to hear them.
This was also a huge pain because I had to take the speakers off to put on the mounting ring for the grille, and of course I had soldered the speaker connections in place, so I had to un-solder them, mount the ring, then solder. Ugh. I generally solder wire-to-wire connections in home theater, but never again with the car. Use terminal connectors.
Anyway, putting the panel back on isn't too bad. First, if there are any of the white fasteners still stuck in the door, take them out and attach them to the panel--much easier this way.
Then, when putting the panel back on, start from the top. Kind of put the top edge up against the glass, then slide it down over the lock and into the top holes. Then re-attach the door lock cabling. Getting the door pull handle housing back through the panel will require some jostling, and you'll want to make sure you've re-seated that housing. Then go around the door panel and push in the panel at the fastener points. Then screw the relevant screws back in and don't forget those pop-up fasteners.
Re-attaching the handle itself isn't too bad. There's a hinge-like mount on the back and a spring clip in front. I seated the hinge mount first then shoved the spring clip into place, and it was set.
Overall, with all the screw-ups and cutting the door panel and all that, it took me several hours to do the first back door. However, the second one took me like 45 minutes, tops. Having some remote clue what you're doing makes a big difference.
Installing Front Door Speakers
This was a lot easier for me because I had done the rears, which gives some useful experience, and because there's a really good site out there which provides a lot of detail, moreso for the fronts:
http://www.astolfo.com/p5/p5.asp
The basic steps are the similar for the fronts, except that this time I had to mount both the woofer and the tweeter (and a crossover) since I went with component speakers. However, there was no cutting of the door since the speakers didn't stick up too much like with the rears.
1. Remove the door panel
The web page above tells you pretty much everything relevant about removing the old panels, nicely illustrated. The only thing I'd add here is that I also took out the sailplanes since that's where I mounted the tweeters. That's just a piece of plastic that simply pops off, no problem there.
2. Remove the old speaker
Again, just unscrew the screws there, and again maintain the integrity of that harness.
3. Mount new stuff
There's more new stuff to mount with the components, so I'll walk through the steps.
3.1 Mount the bracket for the woofer
I went with a 6.5" round speaker rather than the standard 5x7/6x8 deal because I don't really like the way ovals sound (some basic physics suggests that this shouldn't be a surprise). Of course, the bracket supplied by JBL doesn't handle this kind of mount so I again needed a plastic adapter bracket (the SA68). I went with the same basic procedure here as for the rear doors: Dynamat, plastic adapter bracket, Dynamat, and metal JBL adapter bracket. However, when you're done with the bracket, wait on putting in the woofer.
3.2 Mount the tweeter
I just followed the surface mount instructions that came with the speaker, worked fine. However, one important bit regarding wiring. There's already a wire that goes up behind the sailplane (for the power mirror). To minimize cable runs, I just taped the speaker leads to that. That's fine, but you want to allow a lot of slack at the top. The reason is that it's hard to put the door panel back in there when the sailplane is in place, so you want to have the sailplane out of the way. Thus, you need some extra slack there.
One thing you can find people arguing about is where the tweeter should be mounted. Mounting in the sailplane will tend to "raise" the perceived soundstage away from your feet, which is good, but too much separation between tweeter and woofer will sometimes put the two signals out of phase, which is bad. Thus, some suggest flush mounting near the woofer and angling the tweeter toward the listener. So, how to decide? Well, I ran the setup with the tweeter just mounted via duct tape to see how it sounded. I liked it better on the sailplane, but your mileage may vary.
It turns out that actually having everything mounted changes the transfer function a little and I don't think the tweeter sounded quite as good when everything was done as it did when I first heard it up on the sailplane. On the other hand, the lower flush mount means cutting the plastic door panel, and I really didn't want to do that given how badly that went with the rear doors.
3.3 Mount the crossover
The big question that has to be answered is where to put the crossover. Why the crossover has to be so bleeding big is a huge mystery to me--the thing seems huge to me relative to the amount of circuitry in it. So, that makes mounting it a problem. However, there's a pretty good spot, which I just missed:
The picture shows it with the bracket, tweeter, and crossover in place:
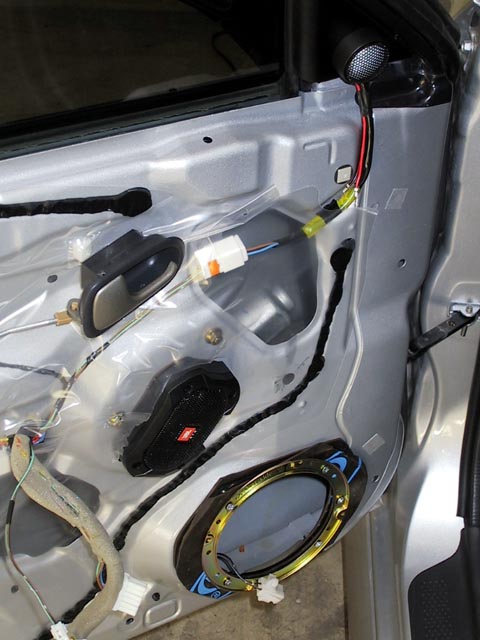 Picture #8
It's a nice surface in a convenient location, but the door panel has a pillar that comes down to the door surface that bumps the crossover when it's mounted where it is in the picture. I used basically the same spot in the passenger door, just moved up about an inch so the top of it was near that upper bolt, and that worked great.
I didn't want the crossover to rattle if the door shakes, so again I put down some Dynamat before I mounted the crossover. This was a bit exciting, too, since this was the first point at which I actually drilled into the sheet metal. I survived, of course, but be careful when drilling as there's something there right behind that spot and you probably don't want holes in whatever that is.
3.4 Wiring
There's a little bit more wiring to do, as you have to wire the crossover, too. It's not hard but just remember to keep track of positives and negatives as you go. There's a little hole just above the woofer hole which makes a great mini-conduit. Here's the relevant pic, now with the woofer in place:
 Picture #9
4. Restore door panel
Again, not too bad. I found this went easier if I rolled the window down first and didn't have the sail plane in place, otherwise the same tips as the back door apply here. Then once the door panel is in place, just snap in the sail plane. I must say I do like the look of the tweeter up in the sail plane:
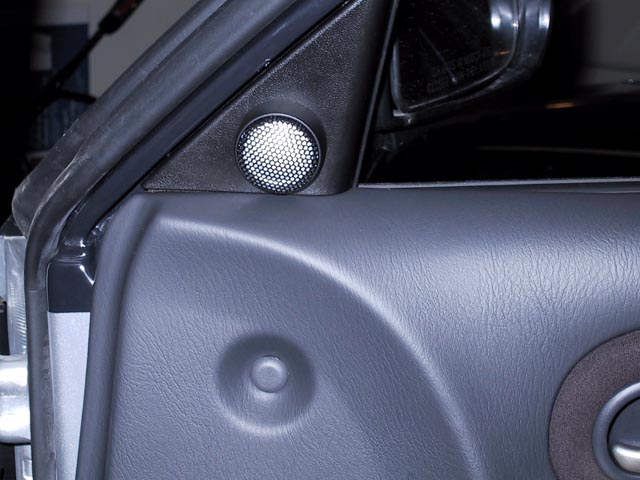 Picture #10
By the time you get to the fourth door, this will be a snap. It's just amazing how much better and faster it goes when you've had some practice with all the various pieces.
The Verdict
So, now that I've done all that, what do I think? Well, I have a number of reactions.
First, I love how they sound! I got the most amazing thing when I put in music when this was all done: clarity! It's amazing how much clearer the new speakers sound, especially with the highs. I can actually really hear the difference between a high-hat and an ordinary cymbal. Everything is just so much clearer and more musical. Definitely worth it.
However, I'm very bummed about how the back doors look. They're ugly with the panel not quite meeting up with the edges of the grilled speaker. I mean, it doesn't look that bad unless you're really looking for it, but it sure doesn't look clean. I wish I knew what to do about that, and I'd love to hear suggestions. At least I do like the way the tweeters look up in the sailplanes.
The other thing of note is that the new setup actually plays a little quieter than the stock cardboard speakers. I know, that seems weird, but the new speakers are going to require more power to really sing and sound even kind of loud. This seems like a very small price to pay for the dramatic improvement in sound quality. I have a JBL 4-channel amp (the P80.4) ready to go, but I think after all this I'm going to pay someone else to handle that installation. It should fit lengthwise under the passenger seat and not interfere with the duct work down there, so it should be a relatively invisible install.
It's not surprising that the new speakers are better, just look how the rears compare to the stock speakers:
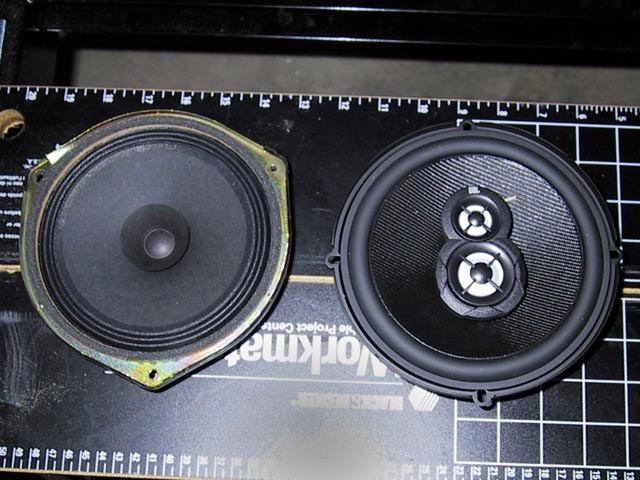
|
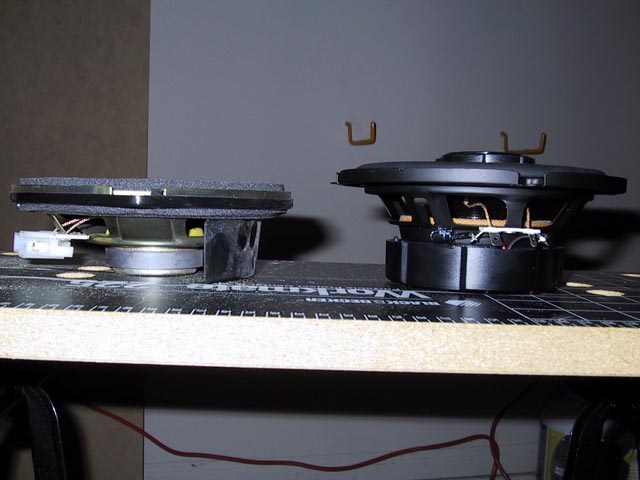
|
Nice whizzer tweeter on the stock speaker, eh? And check out those magnets!
If you have questions or suggestions, please drop me an email!
Last modified 2002.05.29, Copyright ©2002 Mike Byrne